Azure Pipelines Code Coverage for .NET 7 using xUnit and Coverlet


Unit tests are an extremely important part of software development. It ensures a reliable and robust engineering environment where quality is paramount. In my opinion the biggest advantage is that we dramatically reduce bugs in production. This is because if we make changes in one section of the codebase, this could affect something else in another section which causes the section to break and if you have unit tests, they should fail. If we did not perform any tests then we would definitely get errors in production and this would lead to unhappy customers which is not what we want.
Now you maybe be thinking, do I need code coverage? Yes you do. Code coverage identifies gaps in your testing. I often see tests missed for conditional statements that perform a few checks and as a result an error could very well pop up in production. In this post I will be going through how to setup code coverage using open source tools to generate and display a friendly report for us on an Azure Pipeline.
Note - I did have a google and there is information but for a .NET project the information seemed scattered and incorrect so hopefully this post will clear that up. In this example, my project is a .NET project.
Firstly, we are going to need a yaml file which restores, builds and tests our .NET project. I have a solution which contains 2 projects, a project which contains the business logic and a test project. The test project is a xUnit project and when you create an xUnit project, a package called coverlet is automatically installed. Coverlet is a cross platform code coverage framework for .NET, with support for line, branch and method coverage. In its simplest form, your yaml file might look like the below.
trigger:
- main

pool:
  vmImage: ubuntu-latest

variables:
  buildConfiguration: 'Release'

steps:
- task: DotNetCoreCLI@2
  inputs:
    command: 'restore'
    projects: '**/*.csproj'

- task: DotNetCoreCLI@2
  displayName: 'dotnet build $(buildConfiguration)'
  inputs:
    command: 'build'
    arguments: '--configuration $(buildConfiguration)'
    projects: '**/*.csproj'

- task: DotNetCoreCLI@2
  displayName: 'Test Projects'
  inputs:
    command: 'test'
    projects: '**/*Tests.csproj'
    arguments: '--configuration $(buildConfiguration) --collect:"XPlat Code Coverage" '
    publishTestResults: true
The restore and build task are straight forward. However in the test task, you will see the argument "--collect:"XPlat Code Coverage". This is the command that will actually generate a file for us that we then use later on to generate a viewable report.
Next we need to install a tool called ReportGenerator and then run a command that generats our final report. ReportGenerator converts coverage reports generated by coverlet, OpenCover, dotCover, Visual Studio, NCover, Cobertura, JaCoCo, Clover, gcov or lcov into human readable reports in various formats. Add the below to your yaml file.
- task: PowerShell@2
      displayName: 'Install ReportGenerator Code Coverage  Tool'
      inputs:
        targetType: 'inline'
        script: |
          dotnet tool install --global dotnet-reportgenerator-globaltool


- task: PowerShell@2
      displayName: 'Execute ReportGenerator Code Coverage Command'
      inputs:
        targetType: 'inline'
        script: 'reportgenerator -reports:$(Agent.TempDirectory)/**/coverage.cobertura.xml -targetdir:$(Build.SourcesDirectory)/coverlet/reports -reporttypes:"Cobertura"'

 - task: PublishCodeCoverageResults@1
      displayName: 'Public Code Coverage Results'
      inputs:
        codeCoverageTool: 'Cobertura'
        summaryFileLocation: '$(Build.SourcesDirectory)/coverlet/reports/Cobertura.xml'
Above, you can see that we install the "reportgenerator" tool and then we execute the command to generate out report. If you have multiple test projects, for example unit and integration then coverlet will generate a coverage.corbetura.xml file for each project. This is an issue because we need a way to combine these files into one. Luckily, reportgenerator has this ability and can combine all the coverage files for us. This argument "reports:$(Agent.TempDirectory)/**/coverage.cobertura.xml" helps us do that. It is recursing through all the directories looking for the coverage.corbetura.xml file. The last task is just publishing that final xml report so that it can be used by Azure Devops to display the report.
Success! Next go to your build and you will see something like the below. You should now see a "Test Coverage" label with the percentage.

Clicking the line highlighted in red will then take you to your report which should look like the below.

We can see that my welcome service has a poor coverage of 66.6%. Let's have a look at what I "forgot" to test. You can click on the "Name" and this will take you to the lines covered in the code file.
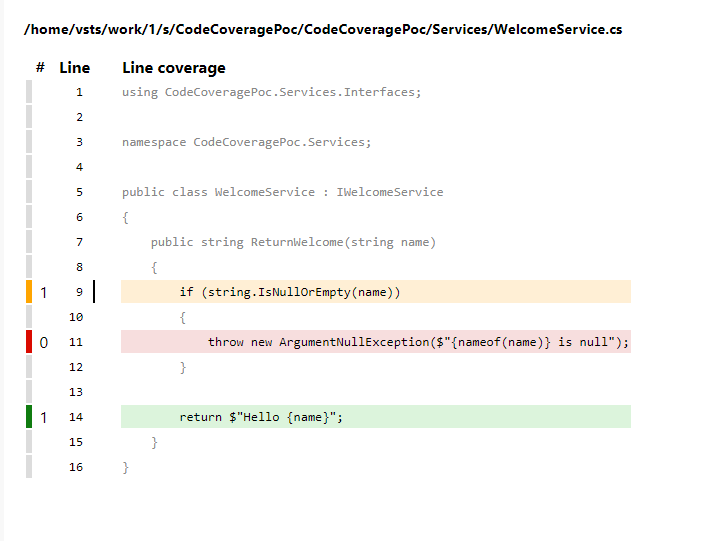
You can see above that I forgot to make a test which passes a "null" or "empty" name. With this now highlighted I can easily see and then create a test to rectify this. As a side note, you can also fail your build if coverage is less than X% which might suit your use case.
And that's it. I hope this post helps you to create thorough tests for your projects and catch them pesky bugs.
Notes
- When I was googling, I saw the reference to coverlet.MSBuild as a nuget package and then on other posts I was seeing instruction to install both. You could use MSBuild if you want although the actually repo recommends to use the coverlet.collector because of a known issue with the coverlet.MSBuild package. Further more, coverlet.collector is installed by default when you create a xUnit project.
- You may be wondering what Corbetura is. Cobertura is tool that calculates the percentage of code accessed by tests. It can be used to identify which parts of your program are lacking test coverage.
- If you are going to use the coverlet.MSBuild then the arguments that you pass are different when testing. An argument passed when running the test task will look like the following "/p:CollectCoverage=true" for example.